OneDrive and SharePoint Online File Deduplication Report | Microsoft Graph API

As an Office 365 admin, should you dedupe files on your SharePoint sites? In the normal case, I think the answer is no. As a general rule, it is cheaper to simply buy more capacity than it is to spend the time rationalizing through other people’s data. But, what if you’ve got a site that you know to be a mess, or maybe you just want to be tidy with your own OneDrive folder?

The second case is why I whipped this up. Over the years, I’ve worked on files that I’ve renamed or or copied into different folder structures, making a mess for myself. I wanted to dedupe them (using PowerShell of course!) but I’m using OneDrive’s Known Folder Move, which means most of the contents in Documents, Pictures, and Desktop are not sitting on my hard drive until I access them.

Let’s quickly talk about how you’d normally dedupe content at the file level, which is different than techniques that dedupe content at the storage (e.g. block) level, which we wouldn’t have access to anyway.

  1. Define the scope of your work. I suggest starting with just the contents of one directory, like your Documents folder. Besides, it would likely cause your users confusion to remove a file from SiteA because you found a copy of the file in SiteB.
  2. Normally this is where you start grouping files by size (called length in PowerShell). Two files cannot be identical if they are different sizes, so it would be a waste of time to hash them. However, in the case of SharePoint Online (including OneDrive), Microsoft has already hashed each file, so we can skip this step.
    • Note: Multiple files with the same name are not necessarily duplicates, so we won’t be evaluating names.
  3. Because Microsoft has already populated the quickXorHash property, we do not need to compute the hash of the files ourselves.
    • As mentioned in the remarks section on the previous link, this attribute is not available in all cases, however I’ve found it to be present in OneDrive for Business and SharePoint Online. We should err on the side of caution anyway, so we’ll just skip files without this attribute.
  4. Group files by the quickXorHash property, and report any group that has more than 1 member (where two or more files are the same).
  5. Generate a report.

The next step would be to decide which instances of a file you want, and then delete the others, but there is a lot to think about before you take that leap. Too much for this article, which will leave you with just the report. Once you’ve figured out which files to remove, it would be simple enough to send the results to Remove-MgDriveItem.

I use the Microsoft Graph PowerShell SDK’s Invoke-MgGraphRequest for all of the API work. If you are just interacting with your own files, you can jump right in. If you want to work on files on other sites, such as the OneDrive of another user account, you’ll want to register a app in your tenant with the Files.ReadWrite permission.

Quick rant: Why use Invoke-MgGraphRequest instead of the Get-MgDrive* cmdlets?

  1. The various mg-whatever cmdlets have inconsistent levels of quality. Microsoft has said that these are machine-generated, and in this author’s opinion, that’s why they often don’t work correctly. I’ve felt this way for a few years now, so maybe the quality has improved.
  2. The cmdlets don’t expose all of the functionality that may be available in the underlying API, or constrain the use of some functionality.
  3. They obfuscate what’s going on behind the scenes (though I love the -debug parameter). You learn a lot more about how M365 works by learning the real API.
  4. Often a cmdlet is more complicated than just using the API directly.
  5. There are so many modules to install!

Quick caveat: So why use Invoke-MgGraphRequest instead of simply Invoke-RestMethod or Invoke-WebRequest like a true purist?

  1. It does a nice job of handling authentication in the background, so I don’t have to keep track of tokens.
  2. The app is already registered by Microsoft:

Back to the dedupe report…

We’ll create a folder on your desktop, and assume it is synced to your OneDrive in the normal manner, as mentioned above with the Known Folder Move feature.

# Create some duplicate files
$Desktop = [Environment]::GetFolderPath("Desktop")
$TestDir = mkdir $Desktop\DupesDirectory -Force
$TestLogFile = (Invoke-WebRequest "https://gist.githubusercontent.com/Mike-Crowley/d4275d6abd78ad8d19a6f1bcf9671ec4/raw/66fe537cfe8e58b1a5eb1c1336c4fdf6a9f05145/log.log.log").content
1..25 | ForEach-Object { $TestLogFile | Out-File "$TestDir\$(Get-Random).log" }

# Create some non-duplicate files
1..25 | ForEach-Object { Get-Random | Out-File "$TestDir\$(Get-Random).log" }

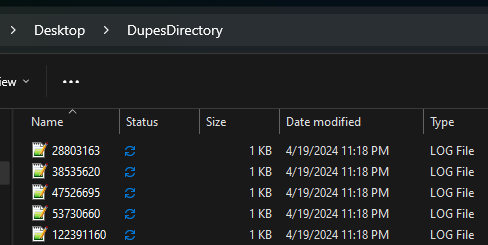
You should now have a DupesDirectory folder. Half of the files are duplicates:

Wait for it to sync to OneDrive before moving on:

In this case, we could use the /me/drive uri, but since we’re building a tool for admins, not an app for end-users, we’ll specify the user in the request, even if that is “me” in today’s demo. This lets us use it for other users and incorporate foreach loops in the future.

(Invoke-MgGraphRequest -Uri 'v1.0/me/drive').value.webUrl

vs

$Upn = "mike@mikecrowley.fake"
(Invoke-MgGraphRequest -Uri "v1.0/users/$Upn/drive").value.webUrl 

Also in this case, we know the folder path to check. It’s ...Documents/DupesDirectory. Let’s use that for now, but I’ll share some thoughts on running this across multiple folders or sites in a little bit. To list the new files, run the below:

Connect-MgGraph -NoWelcome
$Upn = "mike@mikecrowley.fake"
$Drive = Invoke-MgGraphRequest -Uri "beta/users/$($upn)/drive"
$DriveChildren = Invoke-MgGraphRequest -Uri "beta/drives/$($Drive.id)/root:/Desktop/DupesDirectory:/children"
$DriveChildren.value.name

This should list your new files:

Notice how the files have an quickXorHash attribute:

Hmm, do you see what I see? Duplicates!

Note: Microsoft limits the output to 200 objects by default, which is fine for our test, but I’ve included code to loop through additional pages, should you have more files in the future.

# Add a couple of extra duplicate groups to make the report interesting:

1..25 | ForEach-Object { "Hello World 1" | Out-File "$TestDir\$(Get-Random).log" }
1..25 | ForEach-Object { "Hello World 2" | Out-File "$TestDir\$(Get-Random).log" }

The script will place two files on your desktop. One in CSV the other in JSON, which I find to be an easier format for evaluating the duplicate file groups.

Here is the complete code:

https://github.com/Mike-Crowley/Public-Scripts/blob/main/Duplicate-DriveItems_Report.ps1

Some thoughts on searching multiple folders, document libraries, or sites:

Want to search all files on your OneDrive, not just one level of the DupesDirectory folder? It will take more work. First, swap out this line:

$uri = "beta/drives/$($drive.id)/root:/Desktop/DupesDirectory:/children"

With this instead:

$uri = "beta/users/$($upn)/drive/root/search(q='')" 

Be warned – it may take a long time. It also depends on Microsoft’s search index, which may be slower or incomplete, making testing in quick succession unreliable. I got tens of thousands of files returned for my OneDrive, so that felt substantial enough. Unfortunately, and here is the bummer, this does not populate the hashes property. That means you’d need to feed it back in to another call, getting the file explicitly. I will update this post if I find a better solution.

You may want to check for duplicate files across more than just a single drive. In this case, you’ll need to modify the script to include multiple queries (for each site), combining the results into a single array. Otherwise the logic would be the same.

My goal with this article was to introduce the quickXorHash property and show how it can be useful with a dedupe report. If you have more questions about navigating SharePoint or OneDrive through Graph, leave questions in the comments.

EDIT: 23 April 2024: Here is a draft of a better version. Once testing is complete, I will update this article to use this file, which handles recursion, page size and other features.

https://github.com/Mike-Crowley/Public-Scripts/blob/main/Find-DriveItemDuplicates.ps1

☕ Buy me a coffee?

Did you know that over the years, I’ve written every article on this blog without sponsorship, or even a single advertisement on the site‽ In addition to the time I take to research and write articles, each year, I pay for ad-free WordPress hosting so that you dear readers can find what you’re looking for quickly and without intrusive ads.

As you’ve noticed, I don’t post as much these days, but I’d still like to offer this site as a resource to anyone that needs it, without intrusive ads. Do you want to support my efforts?

You Can!

I realize I’m a decade late on this trend, but better late than never!

Resetting Azure AD User Passwords with Microsoft Graph PowerShell

Not many things in IT easier than resetting a user’s password, right? Well, I found the Graph SDK PowerShell module’s Reset-MgUserAuthenticationMethodPassword to be pretty unintuitive. But as with many things, it’s not hard to use once you have an example. I couldn’t find one online, including the usual places (the “example” tab on the resetpassword api article & the cmdlet article), so here ya go:

Connect-MgGraph
Select-MgProfile -Name beta
$user = user1@example.com
$method = Get-MgUserAuthenticationPasswordMethod -UserId $user
  
Reset-MgUserAuthenticationMethodPassword -UserId $user -RequireChangeOnNextSignIn -AuthenticationMethodId $method.id -NewPassword "zQ7!Ra3MM6ha" 

But why use this cmdlet anyway?

Well, in addition to all the reasons tied to the deprecation of Azure AD Graph, and the potential demise of the msonline & azuread PowerShell modules, Microsoft’s Graph beta API currently stands on a short list of places to reset a password and have it also write back to the on-premises Active Directory.

Supported administrator operations

  • Any administrator self-service voluntary change password operation.
  • Any administrator self-service force change password operation, for example, password expiration.
  • Any administrator self-service password reset that originates from the password reset portal.
  • Any administrator-initiated end-user password reset from the Azure portal.
  • Any administrator-initiated end-user password reset from the Microsoft Graph API.

Using this API is especially handy if you have a multi-domain hybrid environment, where connecting to the requisite domain controllers is obnoxious, or in scenarios when you don’t have connectivity to the on-premises Active Directory in the first place.

What is an AuthenticationMethodId?

As you can see in the above code, we use Get-MgUserAuthenticationPasswordMethod to first learn the correct “AuthenticationMethodId”. These are Microsoft’s way to define the various types of authentication you can use with Azure AD, including FIDO2 keys, passwords, the Authenticator app, etc.

(Image source: https://docs.microsoft.com/en-us/azure/active-directory/authentication/concept-authentication-methods)

As of this writing, there are 9 methods to choose from. When resetting a password, you want passwordAuthenticationMethod, which returns a well-known GUID of 28c10230-6103-485e-b985-444c60001490. In fact, this means you may not need to use Get-MgUserAuthenticationPasswordMethod, making this approach faster:

Reset-MgUserAuthenticationMethodPassword -UserId $user -RequireChangeOnNextSignIn -AuthenticationMethodId "28c10230-6103-485e-b985-444c60001490" -NewPassword "zQ7!Ra3MM6ha"

Arguably, a cmdlet whose sole purpose is to reset passwords should have this baked in already, but I suppose the current implementation allows for future scalability.

Azure AD Sign-In Activity Report (Via Get-MgUser)

Another post on the Azure SDK cmdlet module, this time regarding the new SignInActivity attribute.

I am regularly being asked by customers to identify inactive Office 365 accounts. I’m well past the: “lol, you’re saying you don’t know who works here?” part of this problem and just follow up with a discussion on the criteria for “inactive”. The most in-depth analysis include looking at Exchange, Teams, and SharePoint usage, but I’m finding this new beta API attribute to be real handy.

Question-1: What is SignInActivity?

Answer-1: It’s an attribute exposed through the the Microsoft Graph Beta API (not Get-Msoluser or Get-AzureADUser). The How to detect inactive user accounts topic states it as such:

You detect inactive accounts by evaluating the lastSignInDateTime property exposed by the signInActivity resource type of the Microsoft Graph API. The lastSignInDateTime property shows the last time a user made a successful interactive sign-in to Azure AD.

Question-2: Ok, super, how do I use it with PowerShell?

Answer-2a: Graph of course! Here is a script that I wrote that worked for me:

https://github.com/Mike-Crowley/Public-Scripts/blob/main/Graph_SignInActivity_Report.ps1

Answer-2b: If you aren’t comfortable working with Microsoft Graph directly, or if you just don’t want the hassle, you can also use the Get-MgUser cmdlet from the aforementioned SDK module.

In either case, you’ll need to decide if you’re going to run this against the built-in app: “Microsoft Graph PowerShell” (simpler), or if you want to run it as an custom app registration (less simple, but better for automation). Once you’ve made that decision, assign the permissions.

If you’re using a custom app, use the Azure portal and search the Microsoft Graph API permissions list for:

  • AuditLog.Read.All
  • Organization.Read.All

If you’re using the Get-MgUser cmdlet, you can add these ‘scopes’ with -Scopes parameter of Connect-MgGraph.

Connect-MgGraph -Scopes AuditLog.Read.All, Organization.Read.All

In both of theses cases (app & delegated), you should be prompted once, and depending on how your tenant is configured, your administrator (you?) will need to give consent to the permissions.

NOTE: You don’t need to use the -scopes parameter each time you connect. This parameter is to prompt the permission consent page, which, once approved, is then recorded with the app.

After you’ve connected to Graph, using Connect-MgGraph, you’ll need to switch to the ‘beta’ API. The SignInActivity attribute isn’t exposed to the v1.0 API yet.

Select-MgProfile beta

From here, you can start using PowerShell like you’re used to. One thing to note when pulling the SignInActivity attribute is that you must use the user’s Azure AD GUID for the -UserId parameter, even if normally UPN would have sufficed. For example:

Get-MgUser -UserId 3a927ed7-d581-40ff-96a0-f5185014f0bf -Property SignInActivity | Select-Object -ExpandProperty SignInActivity | Format-List *


LastSignInDateTime   : 10/28/2021 12:10:41 AM
LastSignInRequestId  : c344b3c5-02fc-4fb4-b46f-7fe1624f5e91
AdditionalProperties : {[lastNonInteractiveSignInDateTime, 2021-10-28T02:02:41Z], [lastNonInteractiveSignInRequestId, 5ffc8a91-85b5-421c-8201-75e9fa40797d]}

Here is a more involved example, that demonstrates SignInActivity put together with some Exchange Online attributes (as I said, I am trying to find inactive users, and these additional fields can be helpful). It will create an Excel (.xlsx) file with the following column headers:

UserPrincipalName, CreatedDateTime, DisplayName, Mail, OnPremisesImmutableId, OnPremisesDistinguishedName, OnPremisesLastSyncDateTime, SignInSessionsValidFromDateTime, RefreshTokensValidFromDateTime, Id, PrimarySmtpAddress, ExternalEmailAddress, LastSignInDateTime, lastNonInteractiveSignInDateTime

Before you run the script, you’ll need to install the following modules:

Install-Module ExchangeOnlineManagement
Install-Module ImportExcel
Install-Module Microsoft.Graph.Authentication
Install-Module Microsoft.Graph.Users

Finally, the script itself:

Connect-ExchangeOnline -UserPrincipalName <user>
Connect-MgGraph -TenantId <tenant>
Select-MgProfile beta

$MailUsers = Get-User -filter {recipienttypedetails -eq 'MailUser'} -ResultSize unlimited
$ReportUsers = $MailUsers | ForEach-Object {
    $MailUser = $_   
    
    $Counter ++
    $percentComplete = (($Counter / $MailUsers.count) * 100)
    Write-Progress -Activity "Getting MG Objects" -PercentComplete $percentComplete -Status "$percentComplete% Complete:"    
       
       #to do - organize properties better
    Get-MgUser -UserId $MailUser.ExternalDirectoryObjectId -ConsistencyLevel eventual -Property @(
        'UserPrincipalName'
        'SignInActivity'
        'CreatedDateTime'        
        'DisplayName'
        'Mail'
        'OnPremisesImmutableId'
        'OnPremisesDistinguishedName'
        'OnPremisesLastSyncDateTime'
        'SignInSessionsValidFromDateTime'
        'RefreshTokensValidFromDateTime'
        'id'
    ) | Select-Object @(
        'UserPrincipalName'        
        'CreatedDateTime'        
        'DisplayName'
        'Mail'
        'OnPremisesImmutableId'
        'OnPremisesDistinguishedName'
        'OnPremisesLastSyncDateTime'
        'SignInSessionsValidFromDateTime'
        'RefreshTokensValidFromDateTime'
        'id'        
        @{n='PrimarySmtpAddress'; e={$MailUser.PrimarySmtpAddress}}
        @{n='ExternalEmailAddress'; e={$MailUser.ExternalEmailAddress}}
        @{n='LastSignInDateTime'; e={[datetime]$_.SignInActivity.LastSignInDateTime}}
        @{n='lastNonInteractiveSignInDateTime'; e={[datetime]$_.SignInActivity.AdditionalProperties.lastNonInteractiveSignInDateTime}}           
    )
}

$Common_ExportExcelParams = @{
    # PassThru     = $true
    BoldTopRow   = $true
    AutoSize     = $true
    AutoFilter   = $true
    FreezeTopRow = $true
}

$FileDate = Get-Date -Format yyyyMMddTHHmmss

$ReportUsers | Sort-Object UserPrincipalName | Export-Excel @Common_ExportExcelParams -Path ("c:\tmp\" + $filedate + "_report.xlsx") -WorksheetName report

NOTE: Future updates to this script will be on GitHub:

https://github.com/Mike-Crowley/Public-Scripts/blob/main/MailUser-MgUser-Activity-Report.ps1

Sending Email with Send-MgUserMail (Microsoft Graph PowerShell)

As a follow-on post to the Send-MgUserMessage article, I’d like to discuss Send-MgUserMail.

  • What is this cmdlet?
  • How is Send-MgUserMail different from Send-MgUserMessage?
  • Did I waste a whole bunch of time with the other cmdlet and article only to find a better approach?

To answer the last question first: “The Time You Enjoy Wasting Is Not Wasted Time” 😊

At first glance, it’s silly that there are two brand new cmdlets that basically do the same thing. Though when you look at the underlying Graph namespaces they interact with, you’ll realize this is Graph’s fault for publishing two namespaces! The SDK cmdlet module is just trying to make Graph easier, so we can’t really blame PowerShell.

Send-MgUserMailSend-MgUserMessage
• Uses the Graph sendmail namespace

• Can send an email in a single step

• Requires Mail.Send permission
• Uses the Graph send namespace

• Sends a previously created message

• Could send emails created by an outside process or user

• Can reply and forward messages in a mailbox

• Requires Mail.Send permission, though you’ll possibly be creating the message itself with New-MgUserMessage, which requires Mail.ReadWrite (arguably too much power in most cases)

As we begin to understand by the above table, Send-MgUserMail requires fewer permissions and requires fewer moving parts*, so I expect to be using that instead of Send-MgUserMessage in the future.

*You’re about to see, the “moving parts” may not actually be fewer, since its more complex to use Send-MgUserMail, but I’ve made some functions below that you are welcome to include in your projects to simplify some of the more complex data structures.

To get started, be sure you have the correct modules on your computer and that the app you are using has the correct permissions. In my case, I am using application-based authentication as I mentioned in the previous post. You could also use delegated permissions for this task.

Install the modules:

Install-Module Microsoft.Graph.Authentication
Install-Module Microsoft.Graph.Users.Actions

Next, assign your custom application (or the built-in “Microsoft Graph PowerShell” application) the sendmail permission. You can do this with the -Scopes parameter of Connect-MgGraph, or on the app directly, in the Azure AD Portal. I realize that this is a loaded statement, but Graph API permissions are a topic that is beyond the scope (heh) of this article.

If you need help, you can start with this article for guidance:

Determine required permission scopes

Once permissions are set, you can connect to Graph and start sending email. Unfortunately, Send-MgUserMail‘s main parameter -BodyParameter takes the following object type:

IPathsFh5OjtUsersUserIdMicrosoftGraphSendmailPostRequestbodyContentApplicationJsonSchema

No, I’m not joking. That’s what the documentation says! Needless to say, figuring out what this meant took some tinkering. In the end, it seems that these Mg* cmdlets love nested hash tables. I wrote a couple of functions to simplify the creation of two of them. the rest aren’t functions, but you can follow along to see the PowerShell interpretation of their structure.

This one takes a list ([array]) of email addresses and converts it into the IMicrosoftGraphRecipient object type:

Function ConvertTo-IMicrosoftGraphRecipient {
    [cmdletbinding()]
    Param(
        [array]$smtpAddresses        
    )
    foreach ($address in $smtpAddresses) {
        @{
            emailAddress = @{address = $address}
        }    
    }    
}

Note: Graph’s toRecipients property requires an array of hash tables, even if you have only one recipient. I’ve addressed this in the script with [array]$toRecipients, because I had trouble making the function output an array in all cases.

This next function uploads attachments, first by converting to Base64, and then nesting them in the IMicrosoftGraphAttachment format.

Function ConvertTo-IMicrosoftGraphAttachment {
    [cmdletbinding()]
    Param(
        [string]$UploadDirectory        
    )
    $DirectoryContents = Get-ChildItem $UploadDirectory -Attributes !Directory -Recurse
    foreach ($File in $DirectoryContents) {
        $EncodedAttachment = [convert]::ToBase64String((Get-Content $File.FullName -Encoding byte))
        @{
            "@odata.type"= "#microsoft.graph.fileAttachment"
            name = ($File.FullName -split '\\')[-1]
            contentBytes = $EncodedAttachment
        }   
    }    
}

As I mentioned on the last post, if your attachment size is above 3MB, you should check out this function written by Glen Scales:

Sending a Message with a Large attachment using the Microsoft Graph and Powershell

Finally, here is the script itself. Hopefully, if you’ve followed along thus far, the rest doesn’t require much interpretation.

<#
    Script for sending email with send-mgusermail
    
    Ref:

    https://mikecrowley.us/2021/10/27/sending-email-with-send-mgusermail-microsoft-graph-powershell
    https://docs.microsoft.com/en-us/graph/api/user-sendmail
    https://docs.microsoft.com/en-us/powershell/module/microsoft.graph.users.actions/send-mgusermail

#>

#region 1: Setup

    $emailRecipients   = @(
        'user1@domain.com'
        'user2@domain.biz'
    )
    $emailSender  = 'me@domain.info'

    $emailSubject = "Sample Email | " + (Get-Date -UFormat %e%b%Y)

    $MgConnectParams = @{
        ClientId              = '<your app>'
        TenantId              = '<your tenant id>'
        CertificateThumbprint = '<your thumbprint>'
    }

    Function ConvertTo-IMicrosoftGraphRecipient {
        [cmdletbinding()]
        Param(
            [array]$SmtpAddresses        
        )
        foreach ($address in $SmtpAddresses) {
            @{
                emailAddress = @{address = $address}
            }    
        }    
    }

    Function ConvertTo-IMicrosoftGraphAttachment {
        [cmdletbinding()]
        Param(
            [string]$UploadDirectory        
        )
        $directoryContents = Get-ChildItem $UploadDirectory -Attributes !Directory -Recurse
        foreach ($file in $directoryContents) {
            $encodedAttachment = [convert]::ToBase64String((Get-Content $file.FullName -Encoding byte))
            @{
                "@odata.type"= "#microsoft.graph.fileAttachment"
                name = ($File.FullName -split '\\')[-1]
                contentBytes = $encodedAttachment
            }   
        }    
    }

#endregion 1


#region 2: Run

    [array]$toRecipients = ConvertTo-IMicrosoftGraphRecipient -SmtpAddresses $emailRecipients 

    $attachments = ConvertTo-IMicrosoftGraphAttachment -UploadDirectory C:\tmp

    $emailBody  = @{
        ContentType = 'html'
        Content = Get-Content 'C:\tmp\HelloWorld.htm'    
    }

    Connect-Graph @MgConnectParams
    Select-MgProfile v1.0
    
    $body += @{subject      = $emailSubject}
    $body += @{toRecipients = $toRecipients}    
    $body += @{attachments  = $attachments}
    $body += @{body         = $emailBody}

    $bodyParameter += @{'message'         = $body}
    $bodyParameter += @{'saveToSentItems' = $false}

    Send-MgUserMail -UserId $emailSender -BodyParameter $bodyParameter

#endregion 2

Note: Future updates to this script will be on GitHub:

https://github.com/Mike-Crowley/Public-Scripts/blob/main/MgUserMail.ps1

Sample script to map additional fields to Universal Print attributes.

A quick [re]post to share how to work with the Universal Printing cmdlets:

Unfortunately, the Universal Print Connector doesn’t upload fields from the on-premises object, such as location and comments. Likely this is because “location” is now represented as over a dozen attributes in Azure.

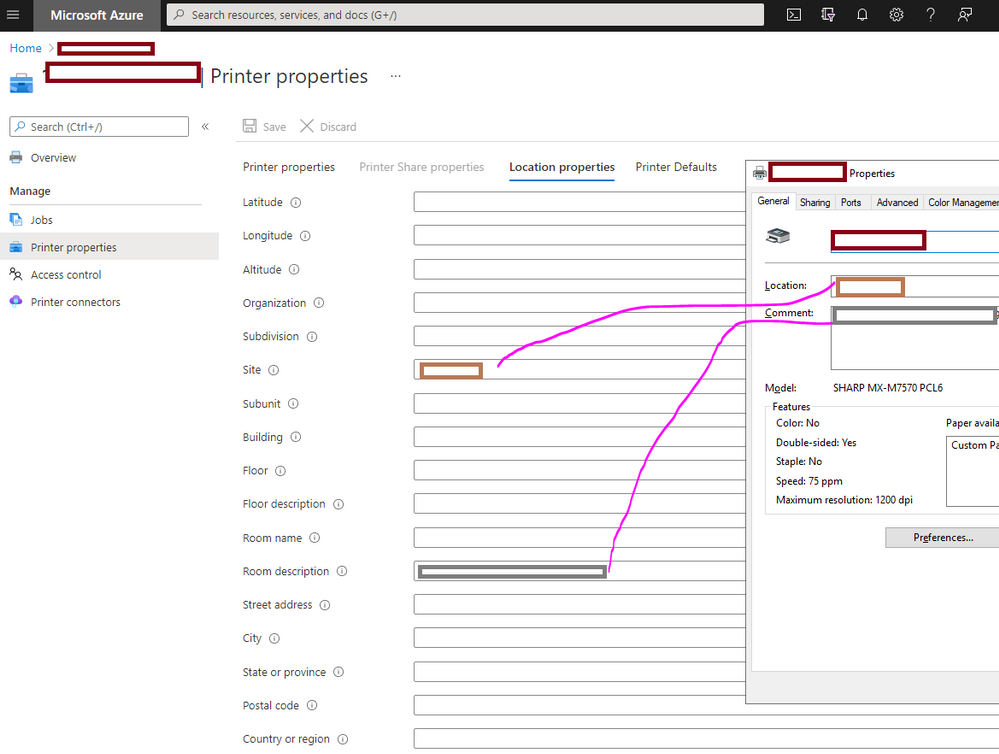
At some point, someone should walk around to each printer and collect the info to populate the attributes properly, but it won’t be me and it won’t be today. 😊 For now, I chose to map the fields as follows, but you can obviously adjust this as necessary:

  • On-premises “Location” = cloud “Site”
  • On-premises “Comment” = cloud “Room Description”

There are innumerable ways to do this, but I like the join-object cmdlet, so be sure to install that first.

Install-Module UniversalPrintManagement
Install-Module join-object 

#Run from the print server:

$OnPremPrinters = Get-Printer 

Connect-UPService 

$CloudPrinters = Get-UPPrinter

$Merge = Join-Object -Left $OnPremPrinters -LeftJoinProperty Name -Right $CloudPrinters -RightJoinProperty name -Prefix Cloud_

foreach ($printer in $Merge) {
    Set-UPPrinterProperty -PrinterId $printer.Cloud_PrinterId -Site $printer.Location -RoomDescription $printer.Comment
}

Using Send-MgUserMessage to send Email (with Attachments)

EDIT 25Oct2021:

This article discusses Send-MgUserMessage, though I’ve since realized Send-MgUserMail might be a more efficient option in many cases.

EDIT 27Oct2021:

I have written a follow on-article for Send-MgUserMail. Check it out when you’re done with this one.

Original Post:

I’ve been incorporating the new “SDK” cmdlets into my work lately, and though I’m not entirely convinced using them is any easier than just working with Graph directly, I wanted to update an old script that used Send-Mailmessage, and managing tokens and HTTP headers felt like overkill. Speaking of Send-MailMessage, you may have noticed this harshly worded message on its help page:

Warning

The Send-MailMessage cmdlet is obsolete. This cmdlet does not guarantee secure connections to SMTP servers. While there is no immediate replacement available in PowerShell, we recommend you do not use Send-MailMessage. For more information, see Platform Compatibility note DE0005.

Send-MgUserMessage is arguably the most direct replacement (see 25Oct2021 edit), but it is more difficult to use, due to the fact we need to build several custom objects, whereas with Send-MailMessage, the parameters did the work for us.

In my scenario, I also wanted this task to run as an application, defined in Azure Active Directory, using application permissions – not delegated through my personal account. Additionally, I wanted to use a certificate to authenticate to Azure instead of managing a “client secret”. I’m choosing not to walk through those prerequisites here, because they are already well documented:

  1. Use app-only authentication with the Microsoft Graph PowerShell SDK
  2. Create a self-signed public certificate to authenticate your application

To get started, install the following PowerShell Modules. I should also point out that if you already have these installed, be sure to upgrade to the latest version (1.7.0 at time of writing), since there have been significant changes in how this cmdlet works.

Install-Module Microsoft.Graph.Authentication
Install-Module Microsoft.Graph.Mail
Install-Module Microsoft.Graph.Users.Actions

Once you’ve got those, you can start sending email. Here is a “simple” example that uses a HTML body, as well as uploads a small attachment (attachments above 3MB are more complicated). In the below example, I’m using a sample book1.xlsx file.

#requires -modules Microsoft.Graph.Authentication,Microsoft.Graph.Mail,Microsoft.Graph.Users

#connect with CBA
# https://docs.microsoft.com/en-us/graph/powershell/app-only?tabs=azure-portal
# https://docs.microsoft.com/en-us/azure/active-directory/develop/howto-create-self-signed-certificate

$ConnectParams = @{
    ClientId = '84af9676-<not real>4194bb6d9e3'
    TenantId = 'ef508849-9d0<not real>5d800549'
    CertificateThumbprint = '96546bf89<not real>67332c703e15123b07'
}
Connect-Graph @ConnectParams

#recipients
$EmailAddress  = @{address = 'user1@recipientDomain.com'} # https://docs.microsoft.com/en-us/graph/api/resources/recipient?view=graph-rest-1.0
$Recipient = @{EmailAddress = $EmailAddress}  # https://docs.microsoft.com/en-us/graph/api/resources/emailaddress?view=graph-rest-1.0

#Body
$body  = @{
    content = '<html>hello <b>world</b></html>'
    ContentType = 'html'
}

#Attachments
# If over ~3MB: https://docs.microsoft.com/en-us/graph/outlook-large-attachments?tabs=http
$AttachmentPath = 'C:\tmp\Book1.xlsx'
$EncodedAttachment = [convert]::ToBase64String((Get-Content $AttachmentPath -Encoding byte)) 
$Attachment = @{
    "@odata.type"= "#microsoft.graph.fileAttachment"
    name = ($AttachmentPath -split '\\')[-1]
    contentBytes = $EncodedAttachment
}

#Create Message (goes to drafts)
$Message = New-MgUserMessage -UserId me@mydomain.com -Body $body -ToRecipients $Recipient -Subject Subject1 -Attachments $Attachment

#Send Message
Send-MgUserMessage -UserId me@mydomain.com -MessageId $Message.Id
 

#end

Once you’re done, the message should look like this in the Sent Items folder of whoever you used to do the sending:

Webcast: Office 365 Tenant Hacks; The Ultimate Guide to Post Migration Setup

If you’re an IT Pro, just wrapping up a migration or otherwise settling into an Office 365 Tenant, check out my recent webcast with Redmond Magazine and Backupify. The offline recording is available now.

Recording:

     Office 365 Tenant Hacks: The Ultimate Guide to Post Migration Setup

Slides:

     Office 365_Tenant_Hacks_The_Ultimate_Guide_to_Post_Migration_Setup.pptx

17Sep2019

Start Outlook in Offline Mode (without opening it first)

I can’t believe how hard this was to find! There are numerous articles, including official ones that claim to answer this question, but all pretty much say the same thing:

“Click this button”

WorkOffline

But that of course means Outlook is already running. Maybe you don’t want that. For example, earlier today I needed to open a profile that was connected to a “corrupt” mailbox, but I didn’t want to risk the offline version of the data, in case it turned out being the only copy I had left. I won’t bother listing a bunch of other reasons we might want to launch Outlook with the connection to the server disabled. I’m sure you’ve got your own anyway, otherwise you wouldn’t be here.

For years I’ve just found other ways to solve whatever my problem was, but not today; today I was finally fed up with all the bad advice on how to go about this (e.g. outlook.exe /safe – does NOT start offline)!

Its pretty much a sure thing that this button toggled a registry value somewhere. It is Microsoft Office after all, and just about every configuration is in the registry. The trick is knowing what key. Outlook 2013 and later seem to love their unreadable hex/binary reg values, so looking at this with the regedit’s FIND feature isn’t going to help. I decided to turn to one of my favorite tools: ProcMon

If you haven’t heard about ProcMon, you should do yourself a favor and check it out. It lets you see what reg/file/network/process profiling & thread activity a given executable is responsible for. Actually, you should save a copy of all the SysInternal utilities in case they find themselves in the cross-hairs of Microsoft’s “cloud-first” software ray gun.

After opening ProcMon and filtering out a lot of noise, I found myself looking at every RegSetValue event Outlook.Exe was doing. I then toggled the “Work Offline” button a few times and saw this entry being flipped back and forth:

00030398

Therefore, it would prove that the values are as follows:

Work Online

[HKEY_CURRENT_USER\Software\Microsoft\Office\16.0\Outlook\Profiles\Outlook\0a0d020000000000c000000000000046]
"00030398"=hex:02,00,00,00


Work Offline

[HKEY_CURRENT_USER\Software\Microsoft\Office\16.0\Outlook\Profiles\Outlook\0a0d020000000000c000000000000046]
"00030398"=hex:01,00,00,00


00030398b

The registry editor is a little odd for this type of value. Its called a binary value, but actually stored in hex, so set it just like the picture above, with only four sets of numbers on the right. If you do, Outlook will open with the “Work Offline” mode enabled.

For what it’s worth, I’ve tested this with Outlook 2016 on multiple computers and also found a mention on the TechNet forums (only able to find this after learning about “00030398”) suggesting it works all the way back to Outlook 2007, so it’s probably reliable, even though it looks like a pretty obscure string of numbers.


Webcast: Don’t Just Survive Your Office 365 Tenant Migration – Master It!

Yesterday I had the opportunity to lead another webcast for Redmond Magazine, this time on the topic of Office 365 Tenant to Tenant migrations. If you have a Tenant to Tenant migration looming on your horizon, or if you’re interested in this topic, you can check out the on-demand recording with the link  below.

https://redmondmag.com/webcasts/2018/05/quest-jun13.aspx?tc=page0

T2T Webcast


Querying msExchDelegateListLink in Exchange Online with PowerShell

9 Mar 2023 Update:

I updated the script to support Modern Auth (OAuth) which is now required for most things in Exchange Online. Details are in the comments of the new script itself:

https://github.com/Mike-Crowley/Public-Scripts/blob/main/Get-AlternateMailboxes.ps1

If you still want the old one, it will be here for a while

https://github.com/Mike-Crowley/Public-Scripts/blob/main/Get-AlternateMailboxes_BasicAuth.ps1

12 Aug 2020 Update:

A few readers contacted me to report this script no longer works. I got around to investigating it today and see the cause, revealed in a Fiddler trace:

X-AnchorMailbox

(larger)

It would seem Microsoft now needs an anchor mailbox, likely to determine what tenant this request is for. I was able to modify my script to accommodate. Sadly, Microsoft is decomissioning the TechNet Gallery, so I may not update that site, just to have them delete it anyway. Please consider including the following in the script yourself:

... 

#Other attributes available here: https://msdn.microsoft.com/en-us/library/microsoft.exchange.webservices.autodiscover.usersettingname(v=exchg.80).aspx
 
$Headers = @{
'X-AnchorMailbox' = $Credential.UserName
} 

$WebResponse = Invoke-WebRequest https://autodiscover-s.outlook.com/autodiscover/autodiscover.svc -Credential $Credential -Method Post -Body $AutoDiscoverRequest -ContentType 'text/xml; charset=utf-8' -Headers $Headers
[System.Xml.XmlDocument]$XMLResponse = $WebResponse.Content 

... 

$Credential= Get-Credential
Get-AlternateMailboxes -SMTPAddress bob.smith2@contoso.com -Credential $Credential

...

Original Post:


There are a number of articles that describe the relationship between the FullAccess permission of an Exchange mailbox and the msExchDelegateListLink attribute. Here are two good ones:

In short, this attribute lists all the other mailboxes your mailbox has FullAccess to, unless AutoMapping was set to $false when assigning the permission. It can be a handy attribute to query when trying to learn what mailboxes might appear in an end-user’s Outlook profile.

This attribute is synced to Office 365 via Azure AD Connect, however, for whatever reason, it is not synced back on-premises for new or migrated mailboxes. It is also not exposed in Get-User, Get-Mailbox, Get-MailboxStatistics, Microsoft Graph or Azure AD Graph.

The information is however included in the user’s AutoDiscover XML response. This is how Outlook knows what mailboxes to mount. If you want to look at this data manually, use the ctrl+right-click tool from the Outlook icon on the system tray. This article describes how to do that, if somehow you’re reading this but don’t already know about this tool:

You can also look at the AutoDiscover XML file via the venerable TestConnectivity.Microsoft.com web site. Look at the bottom of of the file, and you’ll see “AlternativeMailbox” entries.

<AlternativeMailbox>  
<Type>Delegate</Type>
<DisplayName>crowley test 1</DisplayName>
<SmtpAddress>crowleytest1@mikecrowley.us</SmtpAddress>
<OwnerSmtpAddress>crowleytest1@mikecrowley.us</OwnerSmtpAddress>
</AlternativeMailbox>
<AlternativeMailbox>
<Type>Delegate</Type>
<DisplayName>crowley test 2</DisplayName>
<SmtpAddress>crowleytest2@mikecrowley.us</SmtpAddress>
<OwnerSmtpAddress>crowleytest2@mikecrowley.us</OwnerSmtpAddress>
</AlternativeMailbox>

While not exactly the msExchDelegateListLink attribute, its the same difference.

This is neat, but to be useful at scale, we need to query this in PowerShell. Fortunately, there are two methods to fetch the AutoDiscover XML.

You can query these endpoints directly or through the the Exchange Web Services (EWS) API. If you don’t have a preference, Microsoft’s documentation recommends SOAP, which is the approach I’ll discuss here.

Using Invoke-WebRequest and SOAP, we can request specific attributes, such as AlternateMailboxes. Other useful attributes are listed in this article:

While I’m not a developer (developers, please keep your laughter to yourself!), I did manage to cobble together the following SOAP request, which will be the string we “post” to the AutoDiscover service. You’ll notice I’ve marked the user we’re querying and any attributes I might want in bold (modify this list to suit your needs):

<soap:Envelope xmlns:a="http://schemas.microsoft.com/exchange/2010/Autodiscover"
xmlns:wsa="http://www.w3.org/2005/08/addressing"
xmlns:xsi="http://www.w3.org/2001/XMLSchema-instance"
xmlns:soap="http://schemas.xmlsoap.org/soap/envelope/">
<soap:Header>
<a:RequestedServerVersion>Exchange2013</a:RequestedServerVersion>
<wsa:Action>http://schemas.microsoft.com/exchange/2010/Autodiscover/Autodiscover/GetUserSettings</wsa:Action>
<wsa:To>https://autodiscover.exchange.microsoft.com/autodiscover/autodiscover.svc</wsa:To>
</soap:Header>
<soap:Body>
<a:GetUserSettingsRequestMessage xmlns:a="http://schemas.microsoft.com/exchange/2010/Autodiscover">
<a:Request>
<a:Users>
<a:User>
<a:Mailbox>bob@contoso.com</a:Mailbox>
</a:User>
</a:Users>
<a:RequestedSettings>
<a:Setting>UserDisplayName</a:Setting>
<a:Setting>UserDN</a:Setting>
<a:Setting>UserDeploymentId</a:Setting>
<a:Setting>MailboxDN</a:Setting>
<a:Setting>AlternateMailboxes</a:Setting>
</a:RequestedSettings>
</a:Request>
</a:GetUserSettingsRequestMessage>
</soap:Body>
</soap:Envelope>

(For this post, I only care about AlternateMailboxes.)

AutoDiscover requires authentication, so we’ll also need to use the Get-Credential cmdlet. Interestingly, any mailbox can query the AutoDiscover response for any other user in the Office 365 tenant. This means, through PowerShell, I can look up the msExchDelegateListLink / AlternativeMailbox values for other users (even without administrative privileges).

I’ve written a function to return the results in a PowerShell array like this:

Get-AlternateMailboxes-Example

I should also point out:

  • It has the Exchange Online URL hard-coded within, though you could adapt this for other URLs if you’d like.
  • Both SMTPAddress and Credential parameters require valid Exchange Online mailboxes (though, as previously mentioned they do not need to be the same mailbox).

Usage Example:

Get-AlternateMailboxes -SMTPAddress bob@contoso.com -Credential (Get-Credential)

Finally, here is the script itself:

The Cost of Doing Nothing: A Ransomware Backup Story

Once again, I had the chance to present on the topic of ransomware with Redmond Magazine, as this continues to be a hot topic! Quest software’s John O’Boyle and I did what we could to summarize the current state of ransomware in a Microsoft-based environment and provide real-life experiences and advice for dealing with this type of malware. While we had a great turnout, I’m sure some of you missed it, so I invite you to view the offline recording below:

quest-ransomware

The Cost of Doing Nothing: A Ransomware Backup Story

Do You Need Built-in or Bolt-on Security for Office 365?

This week I had a chance to meet with Mimecast’s Strategic Technical Consultant and fellow Microsoft MVP J. Peter Bruzzese to discuss the need or possible lack thereof 3rd party add-on solutions to Office 365 in a webcast this week. This is familiar territory to both J. Peter and I so we had no trouble jumping right into a lively discussion!

If you missed it, please see the offline recording here:

Built-in-Or-Bolt-on.PNG

Preventing and Mitigating Ransomware Infections

Today I had a chance to interview the accomplished author and founder of KnowBe4, Stu Sjouwerman on the subject of Ransomware. Stu shared some great insight and real world experiences in dealing with ransomware outbreaks and the realities we’re faced with (e.g. actually paying the ransom).

If you missed it, you can view the recording for free, here:

cymld2lwgaisima

https://redmondmag.com/webcasts/2016/11/knowbe4121-preventing-and-mitigating-account-compromises.aspx

Discussing Mobile Application Management On RunAsRadio

Microsoft has made Windows Intune a big focus area this year, and at Baseline Technologies, we’re seeing an uptick in customer interest as well. Microsoft’s MDM tool can now truly protect your organization’s data without the old “all or nothing” approach from years past.

A few weeks back I was invited to discuss this with Richard Campbell at RunAsRadio. If you’re interested in this hot area of technology, why not check out the free show!

RunAsRadio499.PNG